Monday, June 13, 2016

Ocean Sunrise Soap


Ocean Sunrise
This is called Ocean Sunrise and is my entry into the Sculpted Layers Challenge this month which features a method of soaping created by Claudia Carpenter.  Thank you both Amy and Claudia for putting this month's challenge together.  What a challenge it has been, a challenge of design, colors, preparation and most of all patience!

I chose this picture of several singles because the waves were best in this photo.  The sun and the birds are embeds, I sprayed them with witch hazel and then rolled in a mixture of Sister Golden Hair, Goldfinger Micas and Bamboo Extract Powder.  The birds were coated trying to get a reflection of the rising sun..  The sky is different colors to reflect how light the sky would be closer to the sun vs farther away and there are clouds of course, what would an ocean sunrise be without clouds and birds???

The soap is pretty consistent throughout the loaf.  

 I have enjoyed using some wonderful butters in soaps lately.  I love murumuru, tucuma and shea butters together.  The added bubbliness of murumuru and tucuma butters is wonderful, you do not need a whole lot and as they are more expensive that is a good thing.  I also like using multiple butters.  This soap is made with Sunflower, Avocado, Coconut and Camellia Oils, Shea, Cupuacu, Tucuma Butters, Babassu Oil and Palm Kernel Flakes and Murumuru Butter.  It stays relatively thin. The fragrance oil is Deviant from Mad Oils and all of the micas are from Mad Oils as well.  The Bamboo Extract Powder is from Brambleberry.  I went with a 6% super fat discount and 33% water discount.  I am happy using either 6 or 7 % super fat lately.  I cooked in oven at 145 degrees for a little over an hour then kept it in there for another 6 hours, then wrapped it up in towels till the next morning.  It came out of the mold easily.


The tops I sprinkled with the gold, yellow, orange and blue micas mixed with alcohol to represent the fading night sky colors.


These were not the first soaps I tried.  I would put pictures up but my phone died and all my other pictures were on it.  I have few pictures of this one and none of the soaping process because of the phone going to black and nothing else, sad, very sad.  I attempted a beach scene with two palm trees and a hammock, I think I will call it Pablo's Island Abstract.  Then two attempts at lighthouse scenes, one had the lighthouse cut in half and the other was built right, just not right, could not wait long enough between layers, definitely a patience problem. I also tried a princess crown, which,  is okay, but again the patience problem. The soaps in the beginning and early stages just would not thicken up like I needed and I added too much detail.
 
I tried using Castor Oil and Sodium Lactate in one of my first batches and the batter ended up getting very thick before I could finish.  This was on one of the more detailed soaps so I learned to lessen the details some.
As frustrating and disappointing my first batches were, I enjoyed this challenge.  I reflected a number of times on how to make the next batch work better.  I had to think a lot about designs that would work better.  Some of the early ones required more layers than 2 1/2 inches of height could handle so trying to simplify the design was important.  Of course, I had to keep telling myself to be more patient and even planned what I could do while waiting for the soap to be ready for "scraping".  Thanks again Amy and Claudia!

Below are my failed soap attempts for this challenge.  I almost did not add them but, oh well.


Saturday, May 14, 2016

Princess Tear Challenge Soap

                                                      Princess Tears Soap
Princesses have special tears, they sparkle and dance!
Using Royal B fragrance oil from Nature's Garden.  Coconut Oil, Palm Kernel Flakes, Murumuru Butter, Castor Oil, EVOO, Sunflower Oil, Argan Oil, Micas from Mad Oils and Brambleberry.
 I had been working on this for a while, the square framed one I was going to put in the Rimmed Soap Challenge but then I saw it had to be a circle soap.  Oh well, it looks like a geyser. The blue ones in back I also thought about putting up but there were a lot of glycerin rives in it, I used Yacht Club on that one.

 I like how the princess tear soaps came out.  The gold mica from Brambleberry actually shows sparkles which I find fascinating and very princess like.

I am sure we all want that perfect tear, but tears can turn into geysers quickly.

Thursday, December 17, 2015

Impression Mat Challenge

Shells Impression Soap.

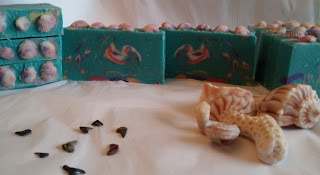
I made several impression mats.  This was the third one.  The first and second had bigger shells and even some shark teeth we collected while at Casperson Beach this summer.  The bigger shells did not work well for me on a log mold because I did not like the idea of having to cut the shells or have a half shell on each slice.


 I put the shells on a picture frame and used the pourable silicone from Brambleberry.  It worked well and I learned a lot making three different molds with it.  My vision here is to have at least a row of shells per slice of soap.


 I scented this one with lavender, geranium, litsea essential oils. I used a small container and for an in the pot swirl for the shells.  Most of the shells we collected on the beaches were colorful so I wanted to incorporate that.  I also put a little gold sparkle mica mixed with oil from Brambleberry on the "shells" after pouring them in the mat but adding the batter after that sort of moved most of it off.  No biggie.


 I used peacock for the base of the soap and used flirt, orange crush, tahitian teal, and harold's purple crayon and gold sparkle mica for the swirls.  The shells had flirt, orange crush and purple crayon for the itp swirl.  I used snow white to whiten the oils.  I did a spoon swirl after all the soap was poured in the main body then the simple swirl on the bottom.


This is the final results.  I added some of the shark teeth in the final pictures after all.  Next time I may try to get those on top, maybe with a guy scent someday???  The spoon swirl left some interesting figures in the soaps and I am happy with the tops as well.

Thanks Amy, always a wonderful challenge!  Merry Merry everyone, a Blessed Christmas and Holidays for all!

Saturday, November 14, 2015

Soap Challenge Skinny Shimmy


The Skinny Shimmy, this month's challenge in the Amy Warden Challenge.  This soap is scented with as Citrus Mint.  I used Spearmint, Grapefruit and Orange 10x essential oils.

The batter stayed liquid through most.  I split all the colors in two and it worked fine.  I used orange tangerine, bright yellow raincoat, peacock and teal micas from various suppliers.

The oils used were of course, coconut, palm and olive oil with additions of babassu, palm kernal flakes, and sunflower oil.  I whitened them with snow mica to try to take out as much green as possible.

This was fun to try, I finally got this result on my third try.  This was a popular scent.  I also tried with lavender spearmint essential oil soap and did not get the S curves I was looking for but this one was a pleasure to cut and see them.  I did use the hand made mold but the soap did not come out so easy even though I put sodium lactate in. 

On the top I just sprinkled jojoba beads, the soap is pretty enough itself!

Thank you Tatiana and Amy for bringing this challenge!  This is a beautiful soap design!

And of course, more pictures!


Saturday, September 19, 2015

This month is Clyde Slide for the challenge.  This is one of my last attempts and I like it.  I am calling it Clyde Sliding Among Cedars.

Made with Babassu, Castor, Coconut, Palm, Olive Canola, Apricot Kernel Oils and a little Kokum Butter.

All essential oils for the scent featuring Cedarwood Atlas, a little Fir Needle and some Sage to round it out.

Used all micas from Mad Oils.  Hope you like it!


Friday, August 14, 2015

Mantra Marble Swirls

Made to Measure

 This is a Brambleberry scent, I am always looking to add to the men's line and this sounded perfect.  It soaped wonderfully, no issues.  I did soap a little thicker but I think it adds to the soaps on the men's lines.


The soap is made with Olive, Coconut, Palm, Avocado, Babassu and Castor Oils with the additional conditioning of Argan Oil.

The colors are from Brambleberry and Mad Oils, goldfinger, white snow, neon lazer lemon, hydrated chrome green, neon blue raspberry with added ultramarine blue.

I did add the fragrance to the oils before the lye water as a just in case, I had no problems with it as I mentioned.

I squirted the colors in from side to side and then combed through it using the bamboo skewer comb. Then I used a thicker - about pencil thick - skewer to make the figure eights.

This was fun to do, nice swirl.  I later made another with lemon and peppermint essential oils. It came out nice as well, the batter remained at very thin trace so the lines are smaller.  I was able to use gold mica on top of that for swirling which does look great.  I love using the mica to add depth and beauty to the swirls but the guys are not so crazy about it though.

These are all the pictures I have.  I can see using this again, it is fun and easy to do


Wednesday, July 15, 2015

The challenge this month is "Opposites" using a divider and a log mold.  I thought about several different opposites, black and white, dry and wet, and a few others.  I decided on high and low with different color schemes. 
I used Hello Sweet Thang for the scent and it behaved wonderfully.  I used micas from Mad Oils.  Opposite sides of the soap are flirt and wicked in white titanium dioxide and then key west blue and goldfinger in white.  I then laid a mica line of 24 k gold. 
Then I let it set up.  One other soap I made, I used the same colors and in the pot swirl for both.  This did look good but I did not use two batches so of course, the mica line was lost.  It is still a nice looking soap though.
Then I set up a second batch and put the same colors on opposite sides.  I then spooned the white layer, added in the colors and was able to hold the mica line fairly well. 
I then laid opposite colors on top again and then finished with this very thin design.
I like how this soap turned out.  The swirls on each side and each layer are different.  It was a simple soap to make but I tried more difficult looks and did not like the way they turned out for this challenge but they are still beautiful soaps. The opposites lie in the colors used and the high low layering of the opposite sides.